
Complex Thought

SKILLS
EFL 4.4.4. Write to describe feelings/ opinions in order to effectively influence an audience. (Example: persuade, negotiate, argue, etc.)
EFL 4.4.5. Recognize that various types of writing require different language, formatting and special vocabulary. (Example: a recipe, a letter, etc.)


REAL-LIFE APPLICATION

This topic helps students explain their ideas more clearly when they analyze images, posters, campaigns, videos, or social media messages. They learn how to show what part of a message is most important, why a visual detail matters, and how language can make an opinion stronger. This is useful when students create school campaigns, give opinions about advertisements, analyze digital content, present projects, or explain why an image makes people think, feel, or act.
LEARNING ACTIVITIES
SESSION 1 (80 min) ANTICIPATION
Part 1: Focus Lens Hunt (20 min)
The teacher shows three campaign-style images with no readable text. They should be visually different: one emotional, one funny, and one serious.

Students do not analyze the whole image immediately. Instead, they must choose the one visual detail that they think matters most. It could be a color, a person’s expression, an object, a background element, a contrast, or a symbol.
This activity introduces the main idea of cleft sentences before the grammar rule appears. Students first experience the need to say, “This part is the important part.” The teacher asks: “What is the most important detail?” and students answer with simple language. Then the teacher upgrades their responses into cleft structures.
Example student answer:
“The broken bottle is important.”
Teacher upgrade:
“It is the broken bottle that shows the problem.”
Another example:
“The sad face makes the image emotional.”
Teacher upgrade:
“What makes the image emotional is the sad face.”
The teacher explains that cleft sentences help speakers put a “language spotlight” on the most important part of an idea.
Part 2: Vocabulary Activation: Visual Message Soundtrack (15 min)
The teacher shows a symbolic campaign image and plays short sounds: applause, silence, traffic, rain, a camera click, a heartbeat, a crowd, or a school bell.
Students decide which sound best matches the visual message and explain why using vocabulary from the list.
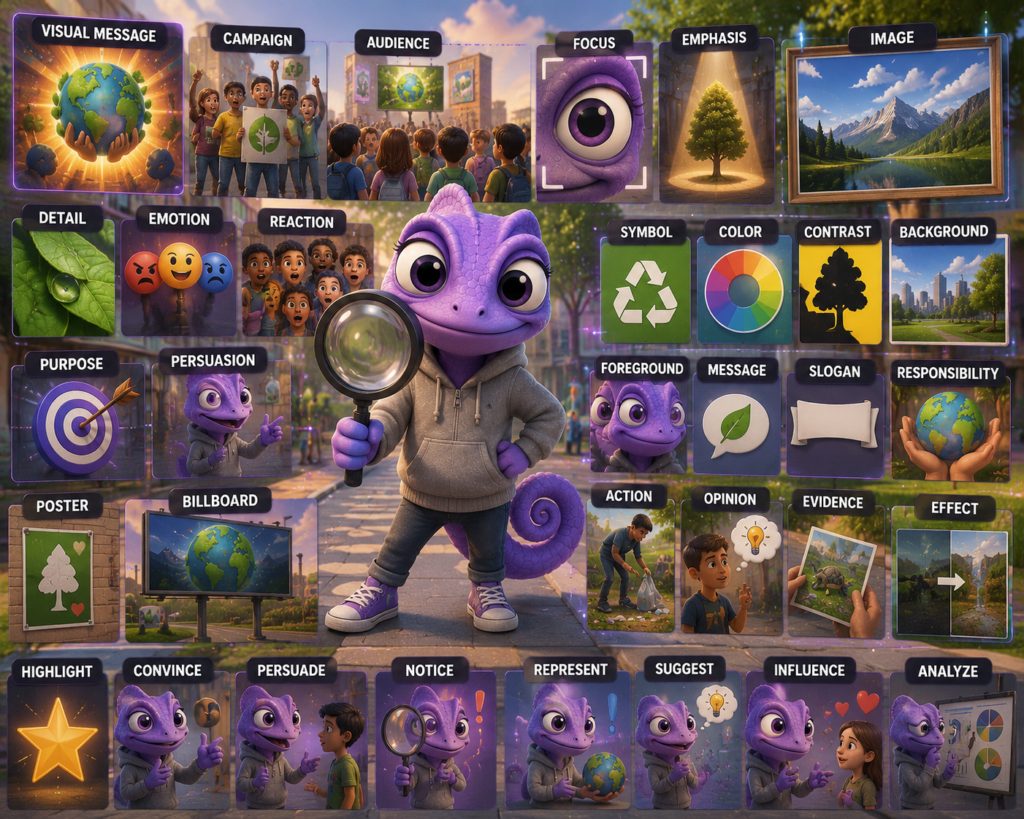
visual message
campaign
audience
focus
emphasis
image
detail
emotion
reaction
purpose
analyze
persuasion
poster
billboard
symbol
color
contrast
background
foreground
message
slogan
influence
responsibility
action
opinion
evidence
effect
highlight
convince
persuade
notice
represent
suggest
The teacher should encourage students to use at least one visual word and one persuasion word in each explanation.
Part 3: Grammar Input: Cleft Sentences as a Language Spotlight (25 min)
The teacher explains that a cleft sentence is a sentence divided into two parts to emphasize one idea. Instead of giving all information with equal importance, cleft sentences help students show what deserves attention.

Normal sentence:
“The image makes the campaign powerful.”
Cleft sentence:
“It is the image that makes the campaign powerful.”
The meaning is similar, but the second sentence sounds more focused. It tells the listener: “Pay attention to this part.”
Common structures:
It is / It was + focus + that / who + rest of idea
Examples:
“It is the color contrast that makes the poster strong.”
“It was the final image that changed the audience’s reaction.”
“It is the speaker who explains the problem clearly.”
What + clause + be + focus
Examples:
“What the campaign needs is a clearer message.”
“What makes the image powerful is the child’s expression.”
“What the audience notices first is the bright color.”
The teacher explains the difference:
Use It-cleft when you want to point strongly to one specific part.
“It is the empty playground that makes the image sad.”
Use What-cleft when you want to explain the key idea or missing element.
“What the poster needs is a clear solution.”
The teacher should connect grammar to thinking: cleft sentences help students avoid vague comments like “This is good” or “The image is strong.” Instead, students learn to say exactly what makes the image strong.
Part 4: Grammar Teaching Idea: Spotlight Stickers (20 min)
The teacher gives groups one campaign image and three removable “spotlight stickers” or digital markers. Each sticker represents a focus:
- object
- emotion
- message
Students place the spotlight on the image and create one cleft sentence for each focus.
Example:
Object focus:
“It is the plastic bottle that shows the problem.”
Emotion focus:
“What makes the image serious is the person’s expression.”
Message focus:
“What the campaign wants is student action.”
This activity helps students see grammar physically. The grammar is not taught only on the board; students use it to mark, select, and explain visual meaning.
SESSION 2: CONSTRUCTION – REINFORCEMENT (40 min)
Part 1 – Persuasion Graffiti Wall (15 min)
The teacher shows a graffiti-style wall with several symbolic images.

Students walk around or view the image from different angles. Each student chooses one symbol and creates a sentence with either It is…that or What…is.
This activity works well because students must defend their visual choice. They cannot simply say “I like this.” They must explain what the symbol does in the message.
Examples:
“It is the cracked planet that makes the wall powerful.”
“What the image shows is the need for action.”
“It is the small hand that represents hope.”
Part 2 – Message Repair Race (15 min)
Students receive weak persuasive comments and improve them with cleft sentences. This should feel like a speed challenge, but the teacher should prioritize precision over speed.
Weak sentence:
“The image is good.”
Improved sentence:
“What makes the image effective is the contrast between the clean area and the polluted area.”
Weak sentence:
“The poster is emotional.”
Improved sentence:
“It is the child’s expression that makes the poster emotional.”
This teaches students that complex thought requires specificity. A better sentence does not only sound more advanced; it explains the reason behind the opinion.
Part 3 – Exit Focus Sentence (10 min)
Each student chooses one visual detail from any image used in class and says one cleft sentence before leaving.
Sentence frames:
- “It is _ that…” “What makes this image _ is…”
- “What the message needs is…”
SESSION 3: CONSOLIDATION (80 min)
Part 1- Preparation: Visual Persuasion Patch (15 min)

Students choose one campaign image and prepare a small “visual persuasion patch.” This is not a poster. It is a small visual badge or patch with three symbols:
- strongest visual detail
- audience emotion
- message or action
They prepare only keywords, not full paragraphs.
This helps students organize their thinking before speaking. The goal is to reduce memorization and encourage controlled fluency.
Part 2 – Persuasion Patch Exchange (50 min)
Students exchange visual patches with another group. The receiving group must explain the original group’s image using cleft sentences. This makes the task more interactive because students are not only presenting their own work; they must interpret another group’s visual choices.
Required language:
“It is ______ that…”
“What the image emphasizes is…”
“What makes the message persuasive is…”
“What the audience might feel is…”
“What the campaign needs is…”
The original group then confirms or corrects the interpretation.
This activity develops both visual analysis and listening. Students must interpret, explain, and respond.
Part 3 – Final Reflection: One Detail Changed Everything (15 min)
Students complete this reflection orally:
“One detail that changed my interpretation was…”
“What I learned about persuasion is…”
“What helps me express complex ideas is…”
This closes the lesson by connecting grammar to thinking, not just to accuracy.

RUBRIC: Complex Thought
NEE – Agregar el tipo de adaptaciones curriculares
Principio II: Pautas 6.1 – 6.3 – 6.4
Principio III: Pautas 7.1 – 8.1 – 9.1
ALUMNO 1: Constante monitoreo. Dar tiempo adicional para el desarrollo de la actividad y se reduce el número de ejercicios o se modifican los ejercicios con un nivel de dificultad reducido, de acuerdo con sus necesidades académicas.
ALUMNO 2: Constante monitoreo, Dar tiempo adicional para el desarrollo de la actividad y se reduce el número de ejercicios o se modifican los ejercicios con un nivel de dificultad reducido, de acuerdo con sus necesidades académicas.
ALUMNO 3: Constante monitoreo. Corroborar que el contenido entregado en clase haya sido comprendido por la estudiante mediante retroalimentación.